Titrimetric (Volumetric) Methods of Analysis
Term 1 - 2026
Course learning objectives
- Explain the basic principles of titrimetric analysis
- Discuss criteria for selecting primary standards
- Interpret potentiometric, thermometric and conductometric titration data
- Perform titrimetric experiments including standardization and back titration
- Perform calculations based on titrimetric data, including back titration calculations
- Cite real-world examples of titrimetric analysis
Titrimetric (Volumetric) Methods of Analysis
Four 80-minute lessons covering the principles, primary standards, instrumental endpoint methods, practical standardization and back titration, back titration calculations, and applications of titrimetric analysis.
L1 · Principles of Titrimetric Analysis & Instrumental Endpoint Methods9 content · 5 resources
Lesson objectives
- Explain the basic principles of titrimetric analysis
- State and justify the criteria for selecting a primary standard
- Identify NaHCO3, Na2CO3, KIO3 and oxalic acid (and its salts) as primary standards
- Interpret potentiometric, thermometric and conductometric titration curves to locate an equivalence point
Syllabus objectives covered
- 2.1 — explain the basic principles upon which titrimetric analyses are based
- 2.2 — discuss the criteria used in selecting primary standards
- 2.3 — use data obtained from potentiometric, thermometric and conductrometric methods for titration which do not require the use of indicators
What is a titrimetric (volumetric) analysis?
Titrimetric (volumetric) analysis is a quantitative technique in which the volume of a solution of known concentration (the standard solution) required to react completely with a measured amount of analyte is used to determine the amount, or concentration, of that analyte.
The point at which chemically equivalent amounts of the two reactants have combined is called the equivalence point. The point at which this is observed experimentally (by colour change, or by an instrumental signal) is called the endpoint, and is ideally as close as possible to the equivalence point.
Primary Standard vs Standard Solution
A primary standard is a highly pure, stable substance that can be weighed accurately and used directly (or to standardize another solution) because its exact concentration can be known from its mass alone.
A standard solution is simply any solution of accurately known concentration – it may be made from a primary standard directly, or standardized against one (a secondary standard), as with sodium hydroxide, which is never a primary standard.
Criteria for a Primary Standard
A substance is suitable for use as a primary standard if it:
- is available in a high state of purity;
- is stable at room temperature and does not decompose, oxidize or absorb moisture or from the air (i.e. it is non-hygroscopic and non-deliquescent);
- has a relatively high molar mass, so that weighing errors are minimized;
- reacts completely and in a known, stoichiometric manner with the substance being determined;
- is readily soluble in the solvent being used (usually water).
Examples: sodium hydrogen carbonate (NaHCO₃), anhydrous sodium carbonate (), potassium iodate (), and oxalic acid dihydrate () and its salts.
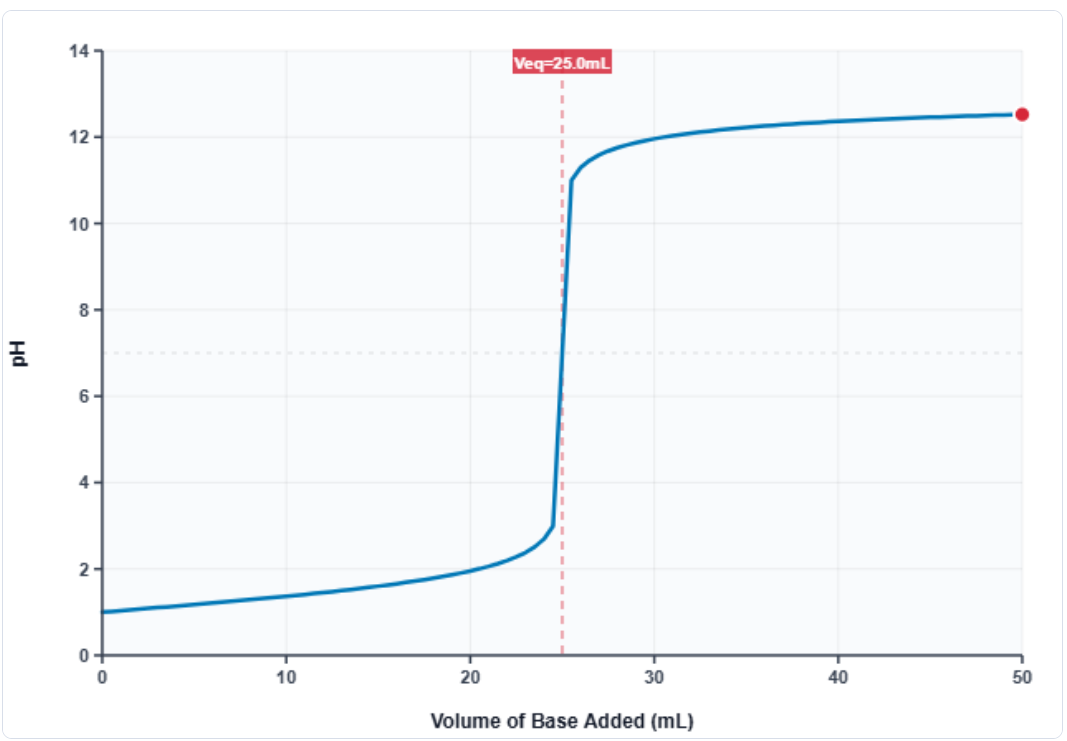
Potentiometric titration curve
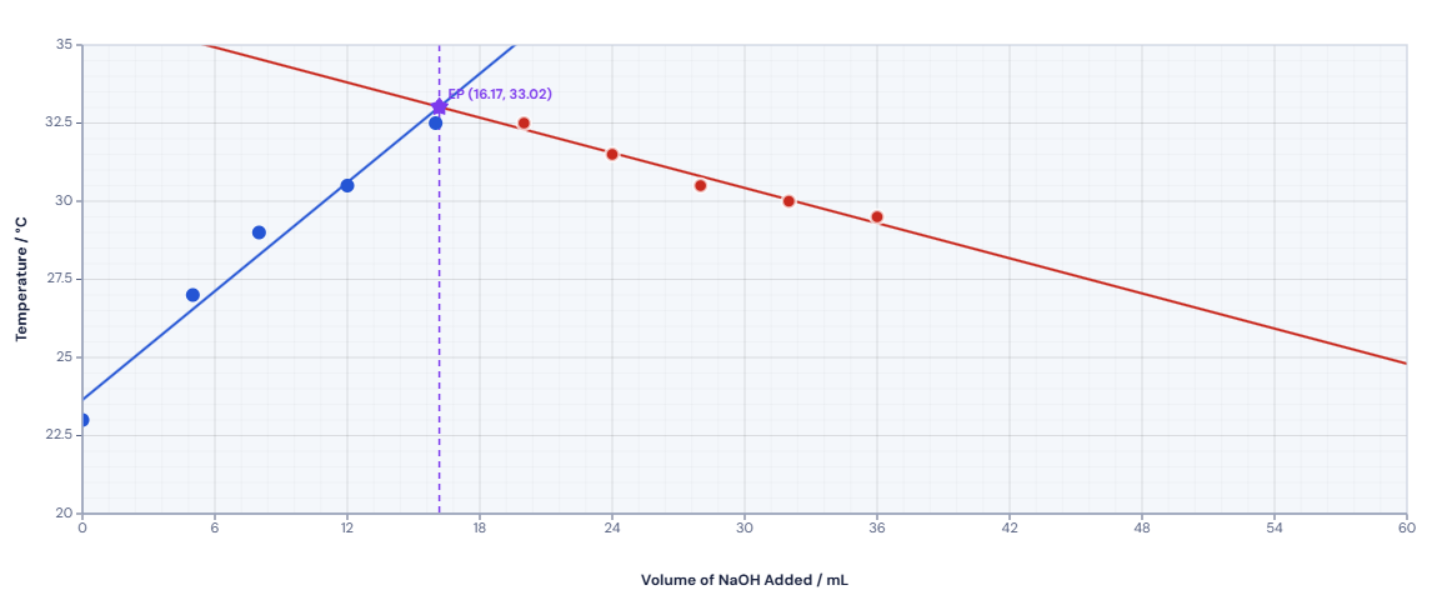
Thermometric titration curve
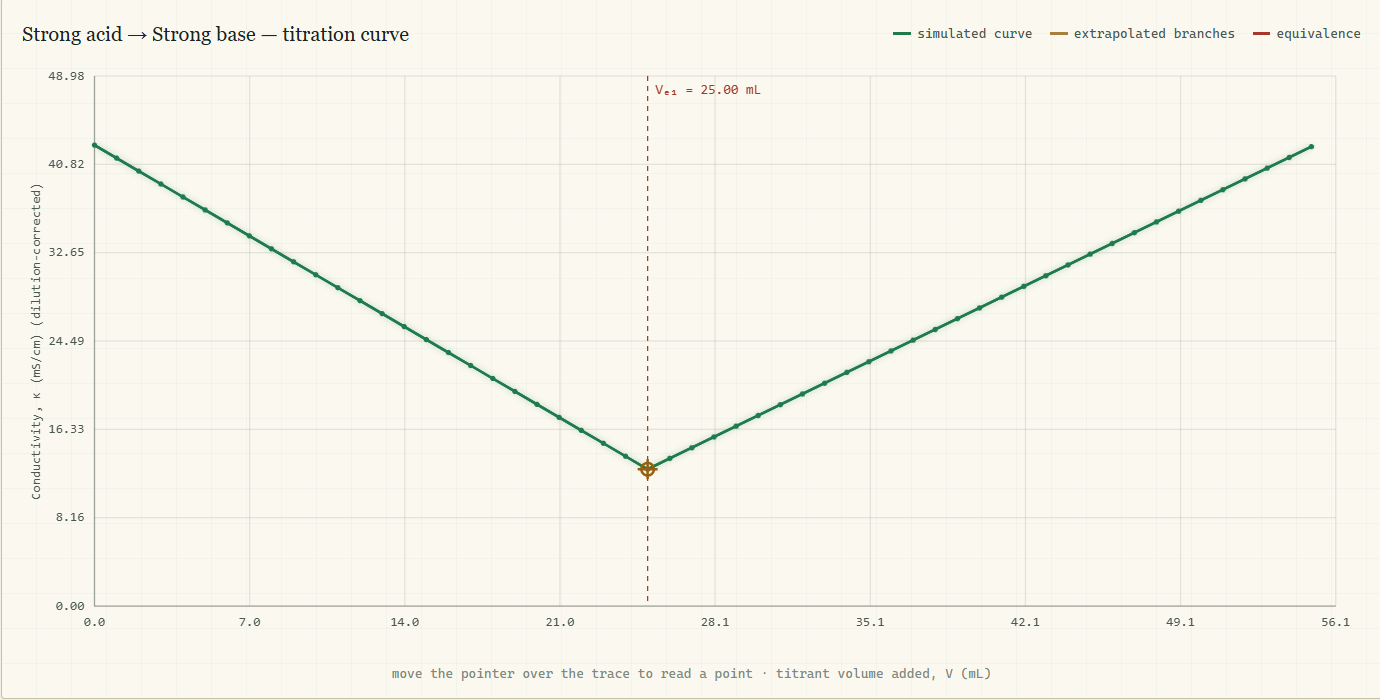
Conductometric titration curve
Reading an equivalence point from a graph
On a potentiometric curve, the equivalence point is the volume at which the pH-vs-volume graph is steepest (the point of inflection) – this can be located precisely using a first-derivative (ΔpH/ΔV) plot. On a conductometric curve, the equivalence point is the volume at the intersection of the two straight-line portions of the graph, since ions are being replaced by ions of different mobility before and after the reaction is complete.
Primary Standard or Not?
Quick Check
Resources
L2 · Practical: Standardizing Sodium Hydroxide with Oxalic Acid5 content · 1 resources
Lesson objectives
- Prepare a standard solution of oxalic acid dihydrate by accurate weighing and volumetric technique
- Carry out an acid-base titration to standardize a sodium hydroxide solution
- Calculate the molar and mass concentration of the standardized NaOH solution
Syllabus objectives covered
- 2.4 — perform experiments based on titrimetric analyses
- 2.5 — perform calculations based on data obtained from titrimetric analyses
Why standardize sodium hydroxide?
Sodium hydroxide is hygroscopic and readily absorbs carbon dioxide from the air to form sodium carbonate, so a freshly made NaOH solution never has exactly the concentration you intended. Because of this, NaOH cannot be used as a primary standard – instead, its concentration must be found by titrating it against an accurately prepared standard solution of a suitable primary standard, such as oxalic acid dihydrate.
Reaction between oxalic acid and sodium hydroxide
Practical technique checklist
Before you begin, review the key volumetric skills you will need today:
- Taring the balance and weighing accurately to the nearest 0.01 g
- Transferring solid quantitatively into a volumetric flask, including rinsing the beaker and funnel
- Filling a volumetric flask to the calibration mark, reading the meniscus at eye level
- Rinsing and filling a burette correctly, and reading it to the nearest 0.05 mL
- Titrating slowly near the endpoint and recognising a permanent, pale pink colour with phenolphthalein
Finding the concentration of NaOH from titration data
Quick Check
Resources
L3 · Back Titration: Calculations and Applications8 content · 2 resources
Lesson objectives
- Explain when and why a back titration is used instead of a direct titration
- Calculate the amount/purity of an analyte from back titration data
- Cite real-world examples of back titration (antacids, fertilizers, carbonate purity)
Syllabus objectives covered
- 2.1 — explain the basic principles upon which titrimetric analyses are based
- 2.5 — perform calculations based on data obtained from titrimetric analyses
- 2.6 — cite examples of the use of titrimetric analysis in the quantification of various substances
What is a back titration?
A back titration (reverse titration) is used to find the amount of an analyte by reacting it with a known excess of a standard reagent, then titrating the unreacted excess of that reagent against a second standard solution. The amount of reagent that reacted with the analyte is found by difference: (moles of reagent added) − (moles of reagent left over, from the second titration).
When is back titration used instead of direct titration?
- The reaction between analyte and titrant is too slow for a direct endpoint
- There is no suitable indicator for the direct reaction
- The analyte is insoluble and cannot be titrated directly
- The analyte is volatile and would be lost during a direct titration
- The direct reaction is between a weak acid and weak base, giving no sharp endpoint
Worked Example 1: Calcium carbonate content of an indigestion tablet
An indigestion tablet is crushed and reacted with 25.0 mL of 1.00 mol/dm3 HCl (a known excess). The unreacted HCl is titrated against 0.500 mol/dm3 NaOH, requiring 25.80 mL.
Step 1 – initial moles of HCl added: n = × 1.00 mol/dm3 = 0.0250 mol.
Step 2 – moles of NaOH used to neutralise the excess HCl: n = 0.02580 dm3 × 0.500 mol/dm3 = 0.01290 mol. Since HCl + NaOH react 1:1, moles of excess HCl = 0.01290 mol.
Step 3 – moles of HCl that reacted with the CaCO3: 0.0250 − 0.01290 = 0.01210 mol.
Step 4 – from CaCO3 + 2HCl → CaCl2 + H2O + CO2, moles of CaCO3 = 0.01210 ÷ 2 = 0.00605 mol.
Step 5 – mass of CaCO3 = 0.00605 mol × 100.1 g/mol = 0.605 g.
Worked Example 2: Ammonium sulphate content of a fertilizer
1.455 g of fertilizer is warmed with 25.0 mL of 0.200 mol/dm3 NaOH (a known excess), releasing ammonia gas. The unreacted NaOH requires 28.70 mL of 0.100 mol/dm3 HCl to neutralise it.
Step 1 – initial moles of NaOH added: n = 0.0250 dm3 × 0.200 mol/dm3 = 0.00500 mol.
Step 2 – moles of HCl used to neutralise the excess NaOH: n = 0.02870 dm3 × 0.100 mol/dm3 = 0.00287 mol. Since NaOH + HCl react 1:1, moles of excess NaOH = 0.00287 mol.
Step 3 – moles of NaOH that reacted with the ammonium sulphate (releasing NH3): 0.00500 − 0.00287 = 0.00213 mol.
Step 4 – from (NH4)2SO4 + 2NaOH → Na2SO4 + 2NH3 + 2H2O, moles of (NH4)2SO4 = 0.00213 ÷ 2 = 0.001065 mol.
Step 5 – mass of (NH4)2SO4 = 0.001065 mol × 132.1 g/mol = 0.1407 g. Percentage by mass = (0.1407 / 1.455) × 100% = 9.67%.
General back titration relationship
Direct Titration or Back Titration?
Now try it yourself
Use the Back Titration Questions worksheet to complete Question 3 (barium hydroxide purity) and Question 4 (magnesium carbonate purity) independently, using the same two-stage method as the worked examples.
Resources
L4 · Practical: Calcium Carbonate Content of Egg Shells (Back Titration)6 content · 1 resources
Lesson objectives
- Recall the role of standardized solutions and primary standards in a quantitative experiment
- Carry out a back titration practical to determine the content of egg shells
- Apply back titration calculations to real experimental data
Syllabus objectives covered
- 2.2 — discuss the criteria used in selecting primary standards
- 2.4 — perform experiments based on titrimetric analyses
- 2.5 — perform calculations based on data obtained from titrimetric analyses
Why this is a back titration
Powdered eggshell is largely insoluble and reacts with acid at a rate that makes a direct titration impractical. Instead, a known excess of standard HCl is added to dissolve and react with the completely, and the leftover (unreacted) HCl is then titrated against standard NaOH – exactly the back titration approach from the last lesson.
Recap: why the HCl and NaOH must be standardized
Every calculation today depends on knowing the exact concentrations of the HCl and NaOH used. Neither is a primary standard on its own – both must have been standardized beforehand (as you did in Lesson 2 for NaOH) against a true primary standard meeting the criteria from Lesson 1: high purity, stability, and known stoichiometric reactivity.
Reactions in this experiment
Practical technique checklist
Key steps to get right today:
- Dry and grind the eggshell fully to a fine powder before weighing
- Weigh the sample accurately (to 0.01 g) into the Erlenmeyer flask
- Measure the standard HCl accurately and allow the reaction to go to completion before heating
- Heat gently in a water bath to drive off dissolved , then cool before titrating
- Titrate the cooled mixture against standard NaOH to a permanent pale pink endpoint
Calculating %$\ce{CaCO3}$ in the sample
Quick Check
Resources
Gravimetric Methods of Analysis
Four 80-minute lessons: two theory, two practical, covering principles, equipment, execution, calculation, and application of gravimetric analysis.
L1 · Principles & Equipment of Gravimetric Analysis6 content · 0 resources
Lesson objectives
- Explain the principles of precipitation and volatilisation methods
- Describe the functions of key gravimetric equipment (crucibles, desiccators, ovens, furnaces, suction filtration apparatus)
Syllabus objectives covered
- 3.1 — explain the principles upon which gravimetric analyses are based
- 3.2 — describe the functions of the various pieces of basic equipment used in gravimetric analyses
What is Gravimetric Analysis?
Gravimetric analysis determines the quantity of a substance by mass. Instead of reading a volume off a burette, the final measurement is a mass taken on a balance - either the mass of a solid product formed from the analyte, or the change in mass of a sample after a component has been driven off.
Because the whole method rests on one accurate mass reading, technique and equipment matter enormously: every step (filtering, drying, cooling, weighing) must avoid gaining or losing mass through routes other than the reaction itself.
Two Approaches: Precipitation vs Volatilisation
Precipitation methods: the analyte is converted into an insoluble compound, which is filtered, washed, dried, and weighed. The mass of the precipitate is used, via its formula and mole ratio, to calculate how much analyte was originally present (e.g. precipitating chloride ions as AgCl, or phosphate as Cu₃(PO₄)₂).
Volatilisation methods: a sample is heated (or otherwise treated) so that a volatile component - often water - is driven off. The analyst weighs the sample before and after, and the mass lost (or mass of residue remaining) is the basis of the calculation (e.g. water of crystallisation in hydrated salts, moisture content of soils, loss-on-ignition tests).
Equipment and Their Functions
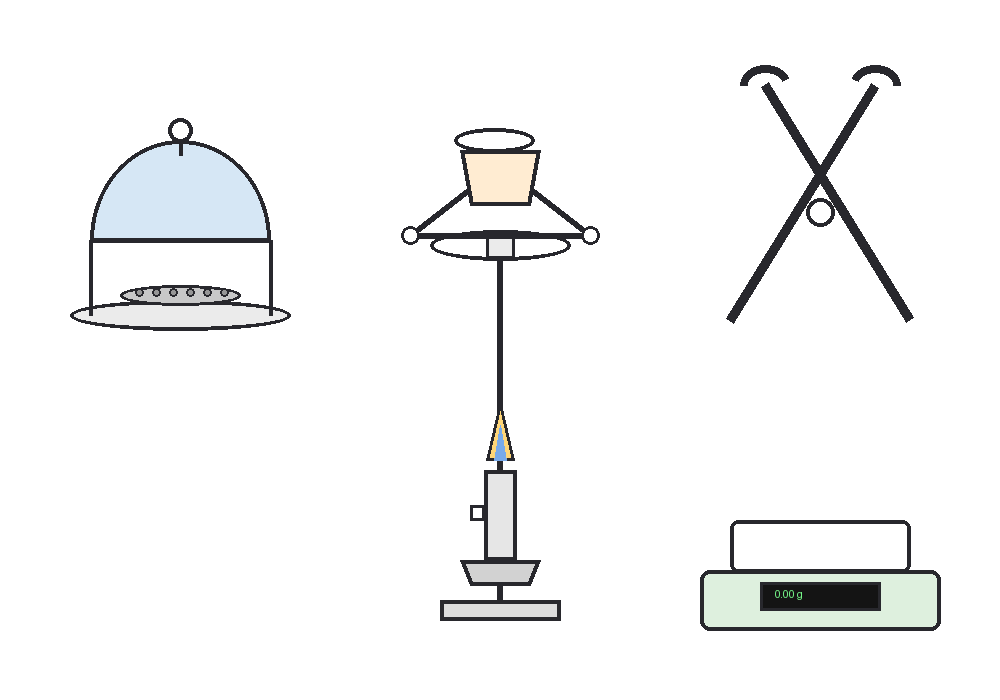
- Silica / porcelain crucible (with lid): withstands strong, repeated heating without decomposing or reacting with the sample; the lid limits spitting/loss of solid while still allowing volatiles to escape.
- Sinter-glass crucible: has a porous glass disc built into its base, allowing a precipitate to be filtered directly into the crucible under suction, then dried and weighed in the same vessel - minimising transfer losses.
- Suction flask & suction funnel: used together (often with a sinter-glass crucible or filter paper) to pull liquid through a filter under reduced pressure, speeding up filtration of a precipitate and helping it pack for washing.
- Ashless filter paper: when ordinary filter paper is used instead of a sinter-glass crucible, an 'ashless' grade is chosen so that, on ignition, it leaves behind a negligible (but not always zero) ash mass - any residual ash mass is measured with a blank and subtracted from the precipitate's mass for an accurate result.
- Oven: dries a sample or precipitate at a controlled, moderate temperature (typically well below 200°C) - used where only physically-bound moisture needs removing.
- Furnace: reaches much higher temperatures than an oven, used to ignite a precipitate to a constant, well-defined chemical form (e.g. converting a precipitate to its oxide) before final weighing.
- Desiccator: houses a drying agent and lets a hot crucible cool to room temperature without absorbing atmospheric moisture, which would add spurious mass.
Label the Gravimetric Apparatus
Precipitation or Volatilisation?
Quick Check: Principles & Equipment
L2 · Practical: Water of Crystallisation in Hydrated Barium Chloride5 content · 1 resources
Lesson objectives
- Carry out a gravimetric determination using correct technique (heating, cooling, weighing to constant mass)
- Record and organise raw experimental data for later calculation
Syllabus objectives covered
- 3.3 — perform experiments based on gravimetric determinations
- 3.4 — perform calculations based on data obtained from gravimetric analyses
Safety & Precautions
- Always use tongs to handle the hot crucible and lid - never your fingers.
- Allow the crucible to cool fully inside the desiccator before weighing; a hot object placed on a balance gives a false (drifting) reading.
- Heat gently for the first two minutes to avoid spitting of the salt, then strongly.
- Tie back hair and loose clothing near the Bunsen burner; keep the barrel collar closed until the flame is lit.
Experimental Procedure Recap
- Heat the empty crucible and lid over the Bunsen burner for 10 minutes; cool in a desiccator; weigh.
- Add approximately 2 g of hydrated barium chloride to the crucible.
- Heat gently for 2 minutes, then strongly for a further 10 minutes.
- Cool in the desiccator to room temperature; reweigh on a top-loading balance.
- Repeat the heating/cooling/weighing cycle until two consecutive masses agree (constant mass).
The Reaction on Heating
Discussion Questions
- What physical changes were observed as the barium chloride hydrate was heated?
- How did the mass of the sample change after heating?
- Why was the crucible reheated and reweighed until a constant mass was obtained?
- What is meant by the 'degree of hydration' of a salt?
- Does your experimental value for the degree of hydration match the known value? Explain any discrepancy.
- How might incomplete removal of water, or overheating, affect the calculated degree of hydration?
Quick Check
Resources
L3 · Calculations from Gravimetric Data & Applications in Quality Control6 content · 1 resources
Lesson objectives
- Convert experimental mass data into moles, mole ratios, and final quantitative answers
- Apply the calculation pathway to mixtures of two analytes
- Cite real-world quality-control applications of gravimetric analysis
Syllabus objectives covered
- 3.4 — perform calculations based on data obtained from gravimetric analyses
- 3.5 — cite examples of the use of gravimetric analysis in quality control
From Raw Masses to a Final Answer
Every gravimetric calculation follows the same pathway:
- Mass to moles - use n = m / M on the substance you actually weighed (the precipitate, or the mass lost/residue).
- Mole ratio - use the balanced equation to relate moles of the weighed substance to moles of the analyte you actually care about.
- Final answer - convert those moles of analyte into whatever the question asks for: a mass, a percentage composition, or a concentration.
Mass-Mole Relationship
Worked Example: Precipitation of Copper(II) Phosphate
Question: An excess of aqueous sodium phosphate is added to a 50.0 mL sample of copper(II) chloride solution of unknown concentration. The precipitate, Cu3(PO4)2, is filtered, dried, and weighed, giving a mass of 18.0 g.
2 Na3PO4 (aq) + 3 CuCl2 (aq) → Cu3(PO4)2 (s) + 6 NaCl (aq)
Step 1 - Molar mass of Cu3(PO4)2:
Cu: 3 × 63.55 = 190.65
P: 2 × 30.97 = 61.94
O: 8 × 16.00 = 128.00
M = 190.65 + 61.94 + 128.00 = 380.59 g/mol
Step 2 - Moles of precipitate:
n(Cu3(PO4)2) = 18.0 ÷ 380.59 = 0.0473 mol
Step 3 - Mole ratio:
From the equation, 3 mol CuCl2 produces 1 mol Cu3(PO4)2.
n(CuCl2) = 3 × 0.0473 = 0.1419 mol
Step 4 - Concentration:
Volume = 50.0 mL = 0.0500 L
[CuCl2] = 0.1419 ÷ 0.0500 = 2.84 mol dm⁻³
Challenge: Analysing a Mixture (NaCl + KCl)
Question: A 0.8870 g sample containing only NaCl and KCl is treated with excess AgNO3. The AgCl formed has a mass of 1.913 g. Calculate the %Na and %K in the sample.
Step 1 - Total moles of Cl- (= moles AgCl):
M(AgCl) = 143.32 g/mol
n(AgCl) = 1.913 ÷ 143.32 = 0.01335 mol total Cl-
Step 2 - Set up simultaneous equations.
Let x = mass NaCl, y = mass KCl, so x + y = 0.8870 g.
Moles of Cl- from each salt: x/58.44 (from NaCl) + y/74.55 (from KCl) = 0.01335
Step 3 - Solve:
Substituting x = 0.8870 - y and solving gives y (KCl) = 0.495 g and x (NaCl) = 0.392 g.
Step 4 - Convert to %Na and %K:
mass Na = 0.392 × (22.99/58.44) = 0.154 g → %Na = 0.154/0.8870 × 100 = 17.4%
mass K = 0.495 × (39.10/74.55) = 0.260 g → %K = 0.260/0.8870 × 100 = 29.3%
Note how a single precipitate mass, combined with the total sample mass, is enough to resolve a two-component mixture - as long as you set up two independent equations.
Gravimetric Analysis in Quality Control
Gravimetric analysis is used across industry and environmental monitoring wherever a precise, absolute mass-based result is needed:
- Determination of SO2 in air, wine, or fruit drinks (a food/environmental safety check).
- Determination of phosphorus (e.g. as phosphate) in fertilisers, to verify labelled nutrient content.
- Determination of chloride ion presence/concentration in water supplies, relevant to water quality standards.
Apply It: Gravimetric Calculations
Resources
L4 · Practical: Gravimetric Determination of Chlorides7 content · 0 resources
Lesson objectives
- Carry out a gravimetric determination using the precipitation method
- Apply the mass-mole-mole ratio calculation pathway to a precipitation result
- Recognise sources of error specific to precipitation gravimetric methods
Syllabus objectives covered
- 3.1 — explain the principles upon which gravimetric analyses are based
- 3.3 — perform experiments based on gravimetric determinations
- 3.4 — perform calculations based on data obtained from gravimetric analyses
Safety & Precautions
- Add dilute nitric acid to the sample before the silver nitrate - this keeps the solution acidic, preventing other insoluble silver salts (e.g. silver carbonate or silver phosphate) from precipitating alongside the AgCl.
- Add the silver nitrate in slight excess to ensure all the chloride present is precipitated.
- Protect the precipitate from strong/direct light where possible - AgCl is light-sensitive and can slowly decompose, which would affect the final mass.
- Wash the precipitate thoroughly with distilled water to remove soluble impurities, but avoid excessive washing, which can dissolve a small amount of the AgCl itself.
Experimental Procedure Recap
- Weigh a sample of the solid metal chloride.
- Dissolve the sample in water.
- Add nitric acid, then excess silver nitrate, to the chloride solution.
- The chloride precipitates as silver chloride.
- Collect the precipitate by filtration.
- Wash the precipitate with distilled water.
- Dry the precipitate.
- Weigh the mass of silver chloride formed.
The Precipitation Reaction
Worked Example: Determining %Cl in an Impure Sample
Question: In the analysis of 0.7011 g of an impure chloride-containing sample, 0.9805 g of AgCl was precipitated. What is the percentage by mass of chloride in the sample?
Step 1 - Molar mass of AgCl:
M(AgCl) = 107.87 (Ag) + 35.45 (Cl) = 143.32 g/mol
Step 2 - Moles of precipitate (= moles Cl-, 1:1 ratio):
n(AgCl) = 0.9805 ÷ 143.32 = 0.006842 mol
Step 3 - Mass of chloride:
mass Cl = 0.006842 × 35.45 = 0.2425 g
Step 4 - Percentage by mass:
%Cl = 0.2425 ÷ 0.7011 × 100 = 34.6%
Extension: Correcting for a Filter-Paper Blank
Question: A 1.1105 g sample of bauxite was analysed for aluminium. The precipitate was ignited on filter paper to form pure Al2O3, giving a total mass of 0.3605 g. A blank test showed that 10 identical sheets of filter paper leave an average ash mass of 0.0006 g each. What is the percentage aluminium in the bauxite?
Step 1 - Correct the precipitate mass for the paper's own ash:
corrected mass Al2O3 = 0.3605 - 0.0006 = 0.3599 g
Step 2 - Moles of Al2O3:
M(Al2O3) = (2 × 26.98) + (3 × 16.00) = 101.96 g/mol
n(Al2O3) = 0.3599 ÷ 101.96 = 0.003530 mol
Step 3 - Moles and mass of Al:
n(Al) = 2 × 0.003530 = 0.007060 mol
mass Al = 0.007060 × 26.98 = 0.1905 g
Step 4 - Percentage aluminium:
%Al = 0.1905 ÷ 1.1105 × 100 = 17.2%
This is exactly why an ashless filter paper (Lesson 1) or a blank correction matters - without it, this result would be too high.